
First things first – this is not meant for any sort of production situation. I have a lab that has/had NSX 6.3.3 deployed, upgraded to 6.35, then 6.4.0, etc. and at this point I don’t even know what state it is in and just want to deploy another scenario for testing. So, now I want to clean it all up but the NSX Manager is not fully cooperating with the VCSA it had been registered to. Again, don’t do this in production – you’d be much better off opening a VMware SR and working to re-register NSX with the VCSA.
In the image below, you can see that I’ve got an NSX Manager (192.168.240.10) deployed along with (3) NSX Controller VMs (they’re in same subnet/VLAN/portgroup).
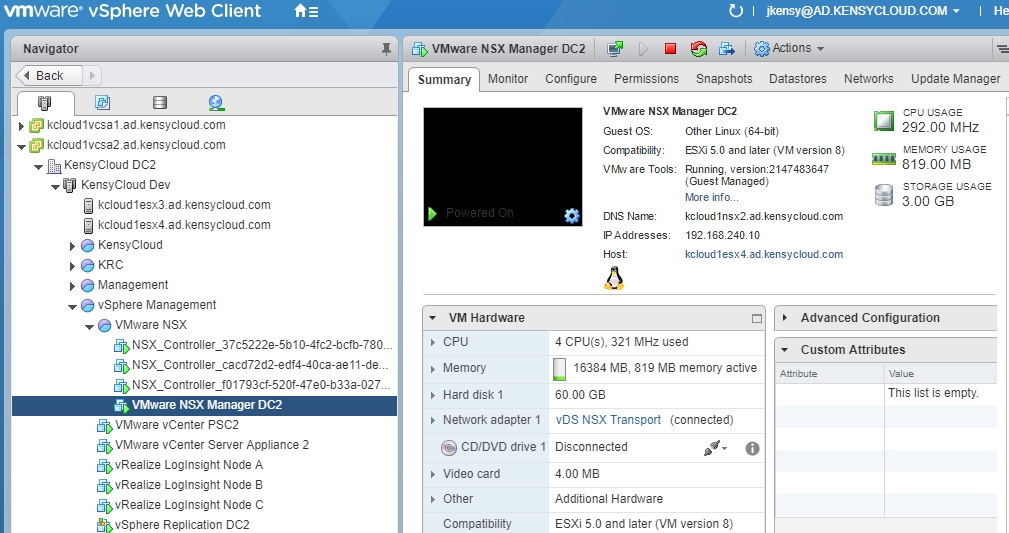
The NSX Manager says it’s registered but you cannot access it from with VCSA:

So again, this is going to server as “nuke it all” instructions. First let’s check that the ESXi hosts even have NSX VIBs registered on them:
[root@kcloud1esx3:~] esxcli software vib list | grep esx
emulex-esx-elxnetcli           11.1.28.0-0.0.4564106                VMware  VMwareCertified   2016-11-20
esx-base                       6.5.0-1.36.7388607                   VMware  VMwareCertified   2018-01-01
esx-dvfilter-generic-fastpath  6.5.0-1.36.7388607                   VMware  VMwareCertified   2018-01-01
esx-tboot                      6.5.0-1.36.7388607                   VMware  VMwareCertified   2018-01-01
esx-ui                         1.23.0-6506686                       VMware  VMwareCertified   2018-01-01
esx-xserver                    6.5.0-0.23.5969300                   VMware  VMwareCertified   2017-08-04
vmware-esx-esxcli-nvme-plugin  1.2.0.10-1.26.5969303                VMware  VMwareCertified   2017-08-04
So, as you can see, neither esx-vxlan nor esx-vsip are installed on the host(s). These are the NSX 6.3.5 VIBs. If you’re dealing with NSX 6.4 then you might see the following:
[root@kcloud1esx1:~] esxcli software vib list | grep esx
emulex-esx-elxnetcli           11.1.28.0-0.0.4564106                 VMware  VMwareCertified   2017-10-10
esx-base                       6.5.0-1.36.7388607                    VMware  VMwareCertified   2017-12-26
esx-dvfilter-generic-fastpath  6.5.0-1.36.7388607                    VMware  VMwareCertified   2017-12-26
esx-nsxv                       6.5.0-0.0.7563456                     VMware  VMwareCertified   2018-02-14
esx-tboot                      6.5.0-1.36.7388607                    VMware  VMwareCertified   2017-12-26
esx-ui                         1.23.0-6506686                        VMware  VMwareCertified   2017-12-26
esx-xserver                    6.5.0-0.23.5969300                    VMware  VMwareCertified   2017-10-10
vmware-esx-esxcli-nvme-plugin  1.2.0.10-1.26.5969303                 VMware  VMwareCertified   2017-10-10
Note that in the output above there is a VIB esx-nsxv which replaces both esx-vxlan and esx-vsip and we do not have guest introspection VIBs installed, either. If the VIBs were there, you’d run esxcli software vib remove -n [vibname] and then reboot the host.
Now that we’ve confirmed the hosts don’t need any messing with, let’s move on to vCenter.
First check that you don’t have any NSX-related dvPortGroups any longer and, if necessary, check for VTEP vmkernels on the host(s):
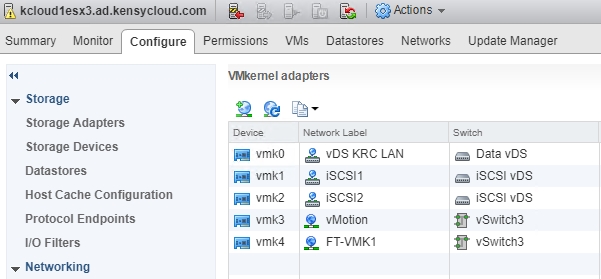
The image above shows that there are no VTEP vmkernels configured. Next we check for dvPortGroups:
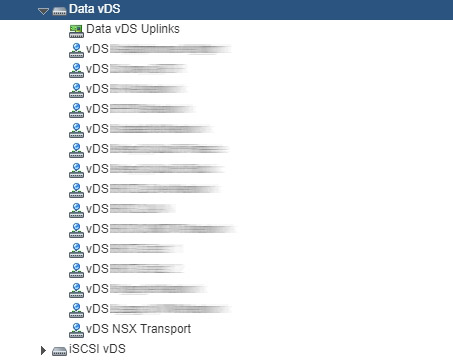
Trust me that there are none in the image above – the dvPortGroup labeled “vDS NSX Transport” is for the VXLAN/NSX transport itself. You’d be interested in a dvPortGroup called something like “vxw-vmknicPg-dvs-…“.
So, we’re good to go. All that is left is to delete the vCenter plugin and some content from the VCSA itself.
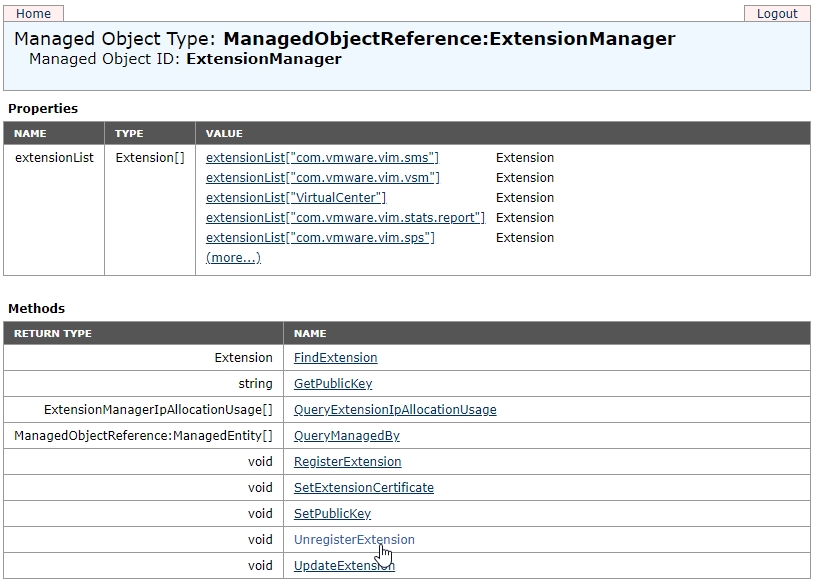
Visit the Managed Object Browser link for your VCSA https://fqdn-of-vcsa/mob and login as a permitted user and click content :
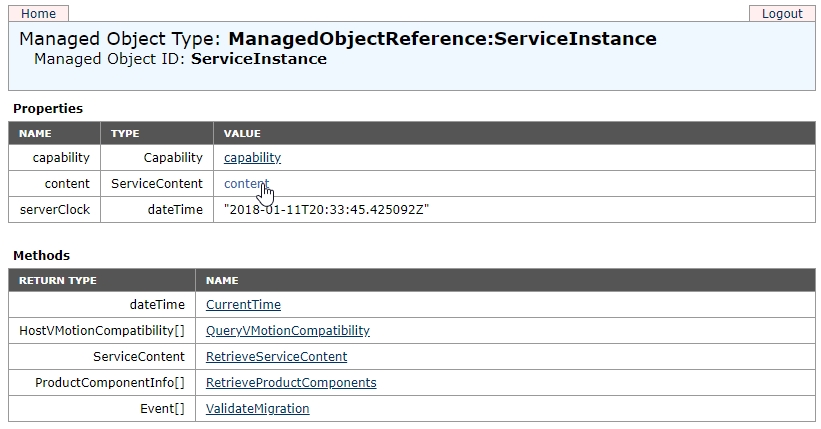
Then click ExtensionManager:

Next select UnregisterExtension:
Finally, type com.vmware.vShieldManager:
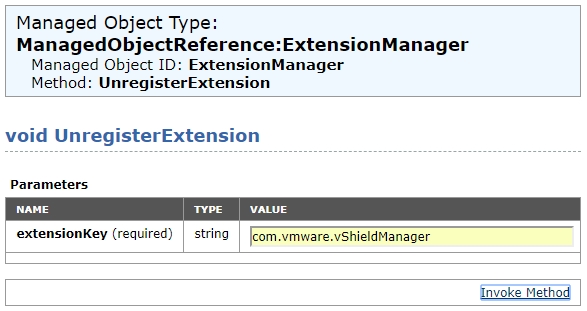
When you select Invoke Method the returned output at the bottom of the window should read “Method Invocation Result: void“.
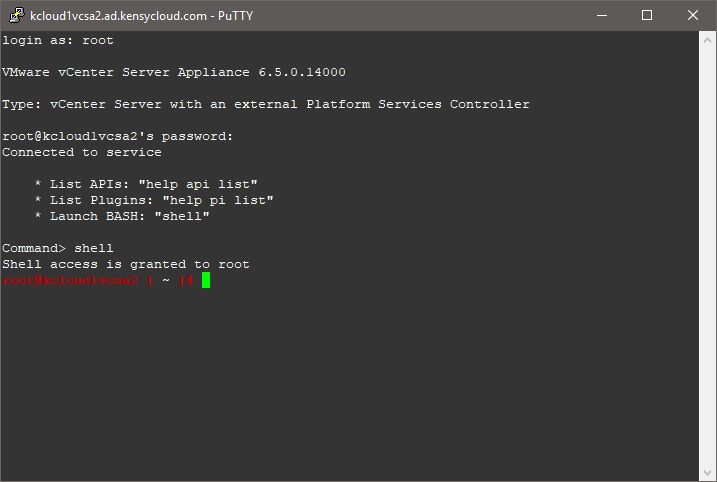
Finally, we want to SSH to the VCSA as root and enable bash shell:
Once at the command prompt, type ls -lah /etc/vmware/vsphere-client/vc-packages/vsphere-client-serenity/ which will show you all of the vShield Web Client directories:
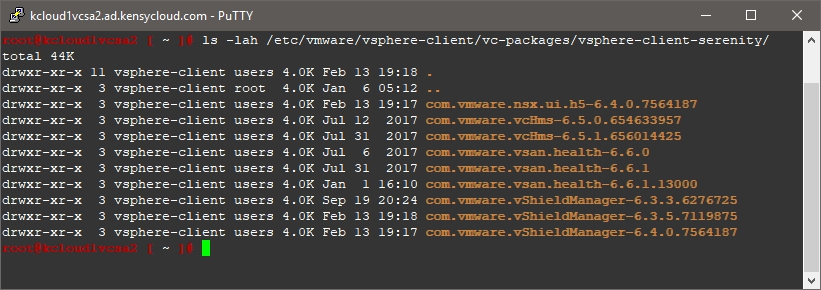
You can see in the image above that this VCSA has seen NSX Manager 6.3.3, 6.3.5, and 6.4.0 – it’s best to just delete all of this at this point. When we rebuild the NSX environment all of the proper versions will be installed again and we don’t need to worry about old files hanging out there. To do this, issue rm -rf /etc/vmware/vsphere-client/vc-packages/vsphere-client-serenity/com.vmware.vShieldManager-6.* but if you’re not confident in doing this, take a snapshot of the VCSA first. If you do an ls -lah again on the path we used earlier you should no longer see anything relating to vShieldManager. You may also consider removing com.vmwarensx.ui.h5-6.4.0.* as shown above in the event you were running NSX 6.4 or later.
Once you log out of vCenter and log back in, you should no longer see any of the “Network & Security” options within the Web Client. In the event that you have Enhanced Linked Mode (ELM) vCenter servers (as I do), you may see the NSX vSphere client directories reappear as ELM allows you to manage NSX from either vCenter (if you have permissions).
Hope you guys find this useful!
 I am a Sr. Systems Engineer by profession and am interested in all aspects of technology. I am most interested in virtualization, storage, and enterprise hardware. I am also interested in leveraging public and private cloud technologies such as Amazon AWS, Microsoft Azure, and vRealize Automation/vCloud Director. When not working with technology I enjoy building high performance cars and dabbling with photography. Thanks for checking out my blog!

March 26, 2019
hi jon
i removed nsx icon from web client, i still see in nsx ui that it is registered to vcenter, and i can not reregister it to vcenter
how should i unregister and remove vcenter from nsx ui?
thanks
April 20, 2019
Facing same problem.