
I wanted to share this super simple Software Component in vRealize Automation that I came up with in order to better streamline Linux deployments to end-users/developers.
My vRA Linux blueprints/templates all have an administrator username and SSH key setup, but require additional users be created or scripted with automation outside of vRA. Not a huge deal, but if you want a truly hands-off solution all within vRA then you don’t want to have to touch the VMs that users are requesting. My administrator user is still configured in the guest should the developer/user break things, so no worries there.
This little demo/guide assumes you have a working Linux VM template already prepared with the appropriate guest agent for vRealize Automation integration.
I am accomplishing this really simple effort using vRealize Automation Software Components. In order to do this, you really need to do only 3 things:
- Definite property definitions within vRealize Automation (these can be created for visibility outside of just the single tenant. These are what you’ll pass around from blueprint to/Machine object to Software Component in order to specify username/password, etc.
- Create your Software Component and bind its properties to the custom defined properties (from step 1) in either the Blueprint object or Machine object.
- Define what scripts will run and pass the various properties from the vRA request to the Software Component.
Property Definitions
vRA allows you to define your own properties outside of the canned ones. You can call them whatever you want but just be sure that they have a name that doesn’t conflict with canned names. You’ll want to set the property type to match the intended use. What I have for this quick demo is:

You can see that for this demo we have three properties we’re concerned with. You can add more easily – just think of anything else you may want to configure… like, maybe you want to allow the user to specify the UID for the user they’re be creating so it’s consistent across machines… just add a property and hook it in for later scripting!
Create your Software Component
In vRealize Automation, a Software Component is an object that can be applied to part of your blueprint design. The cool part about it is that you can pass variables into the Software Component and execute bash or PowerShell scripts based on input received through the request form or through static properties pulled out of the blueprint items. So, let’s get started with creating the Software Component:

Give your component a name and description as shown above. We want to select Machine as the container because we’ll be using it against a machine in a blueprint. If you were going to use a software component to further configure or interact with another software component, you could do that as well.
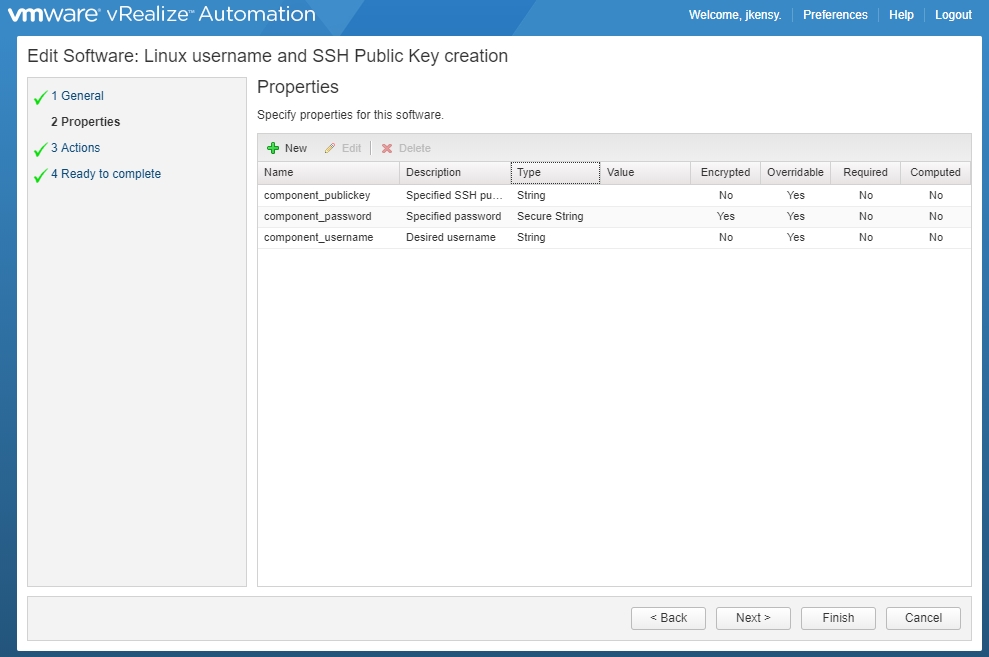
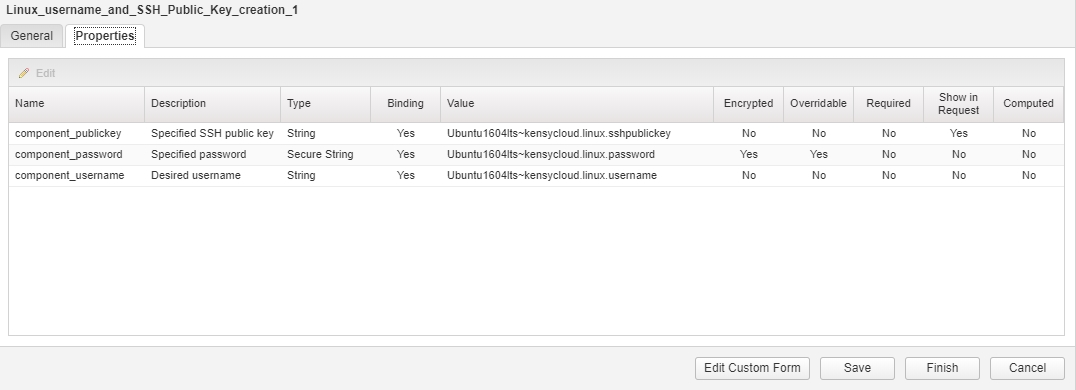
As shown above, we create the properties necessary within the Software Component. What properties are necessary? Well, whatever variables you intend to pull from the machine/blueprint input!
The reason we need these properties in the Software Component is because they are what get passed through to the necessary script portion (i.e., $component_username in the example will be referred to in the bash script). If you don’t need to pass any variables into the script you’re using then you don’t need any properties. This might be applicable if you just want to attach a bash script that will configure an NTP server regardless of any user input.
Finally, we define the actual script that will run:
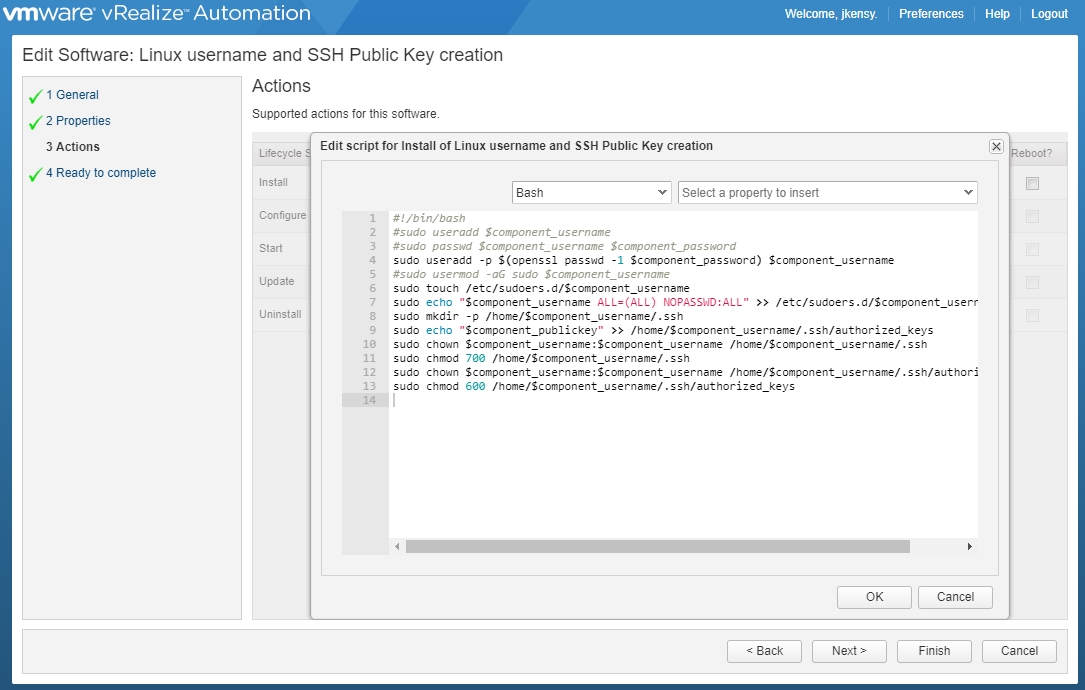
It is important that you configure the Actions portion of the Software Component with the correct script type at the top – you can see I have it set for bash. Notice too that there is a drop-down for properties – whatever you configured as a property for the Software Component can be selected here so you can quickly add them into the script. The scripts are processed in order – so Install then Configure, etc. Update and Uninstall are special cases. The script I am running is:
#!/bin/bash
sudo useradd -p $(openssl passwd -1 $component_password) $component_username
sudo touch /etc/sudoers.d/$component_username
sudo echo "$component_username ALL=(ALL) NOPASSWD:ALL" >> /etc/sudoers.d/$component_username
sudo mkdir -p /home/$component_username/.ssh
sudo echo "$component_publickey" >> /home/$component_username/.ssh/authorized_keys
sudo chown $component_username:$component_username /home/$component_username/.ssh
sudo chmod 700 /home/$component_username/.ssh
sudo chown $component_username:$component_username /home/$component_username/.ssh/authorized_keys
sudo chmod 600 /home/$component_username/.ssh/authorized_keys
Now, I am sure there are more effective ways to do what I am doing in bash but I just get stuff done the way I know how. You can see that we’re creating a user, making them a sudoer, configuring sudo without a password, and then creating the authorized_keys file and dumping the public key specified into that file. It’s really quite simple.
One thing worth mentioning is that in this script I am not doing any sort of distribution validation. This is not a big deal since it’s vanilla bash scripting and native Linux commands. However, if you wanted to install a package called htop at the end, but wanted it to work whether the script was applied to an Ubuntu or a Redhat derived distribution, then you’d either need to let an apt-get install htop -y command fail for Redhat, a yum install htop -y command fail for Ubuntu, or validate the distribution and run the appropriate scrip (this is the right way to do it).
Hint: In this example my template is already set for PasswordAuthentication no in /etc/ssh/sshd_config. You can either modify your template configuration or you can just add sed -i “s/.*PasswordAuthentication.*/PasswordAuthentication no/g” /etc/ssh/sshd_config to your script which will find any line (even commented out) with “PasswordAuthentication” in it and replace it with “PasswordAuthentication no”. Don’t forget a quick little systemctl restart sshd or check the reboot box for the script.
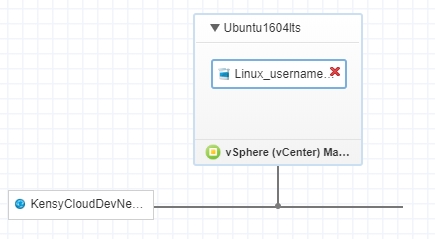
Finally, publish the component and drag it your machine object in blueprint design:
Binding the properties together
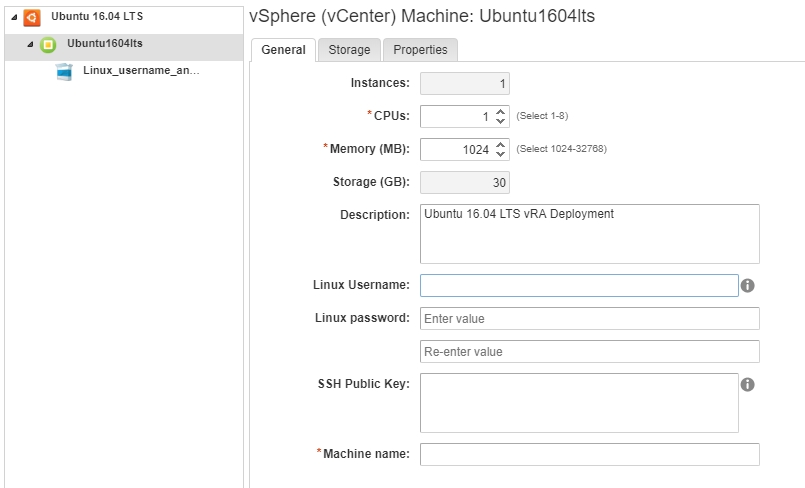
Once you have your Software Component created and properties defined you need to decide where you want to prompt users for input within the request. Because I use this solution for single-tier and multi-tier requests, I am prompting for username, password, and SSH key at the machine object. This is because I may find in the future that I want a different user or key defined on different tiers. You could prompt at the blueprint level and bind there, but then every machine in the blueprint would have the same information. Of course you can change this from blueprint to blueprint based on the purpose
Edit your machine in Design view and navigate to custom properties – once there, you’ll be able to add a new property and choose from the properties you defined earlier:
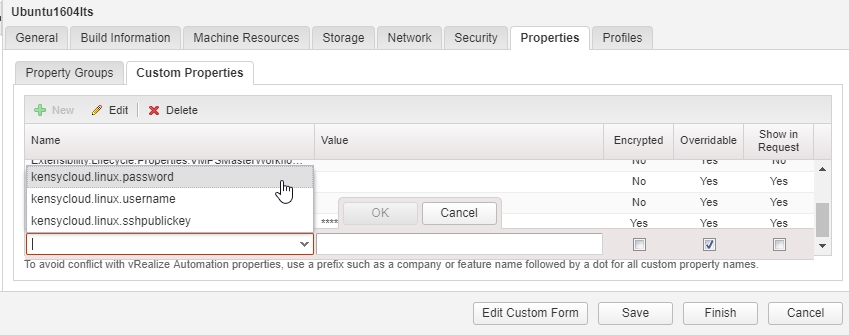
You’ll want to have each property checked for overridable and show in request and for the password field you’ll want that to be encrypted as well.
Finally, on the Software Component properties, you need to bind the properties within the component to those from the machine object:
That’s it! You’re ready to rock!
Now when a user requests this given blueprint they’ll have some additional criteria within the form:
When the VM is built, vRealize will call out to the guest agent and execute the bash script with the criteria provided. Awesome, right?
Another cool application for this very demo is that you could put the guest agent in an AMI up in AWS and so long as the EC2 instance can reach you vRA Appliance and Manager nodes, you can apply software component customization against instances in AWS. This is particularly cool because you ordinarily manage keypairs in AWS itself. Instead, you could give your users reservations to AWS and customize SSH keys post-deploy with vRA instead of having to manage AWS keys.
Boom – one less thing to have to configure for users in the future!
Let me know if you find this useful or want to know how to apply a different configuration to a blueprint.
 I am a Sr. Systems Engineer by profession and am interested in all aspects of technology. I am most interested in virtualization, storage, and enterprise hardware. I am also interested in leveraging public and private cloud technologies such as Amazon AWS, Microsoft Azure, and vRealize Automation/vCloud Director. When not working with technology I enjoy building high performance cars and dabbling with photography. Thanks for checking out my blog!

July 11, 2019
Thanks for ur article. Nice one. plz let me know if there is a possibility to add Linux user post build without software component as out license is limited to Advanced edition.